Know Your House: Stair Design and Construction for a Safe Climb
A stair is an integral part of the architecture in any home that has more than one level, even if there are just a few feet between levels.
In a sense a stair is one of the most important pieces of architecture in a home. More often than not, a home's stair becomes a backdrop for many of life's significant events, including those high-school-prom and wedding-day photos. And as a day-to-day utilitarian item, a stair is a wonderful way to choreograph movement through a home. It's no wonder that architects and designers spend so much time designing stairs, and that true craftspeople build stairs that are absolute joys.
In all of a stair's beauty, choreography and craft are elements that combine structure and material — all set to a required geometry to ensure that a stair is both a joy to traverse and safe. Some things are no longer allowed, such as risers that are too steep, treads that are too narrow, uneven riser heights and tread depths, and more.
Let's look at some of the considerations that go into the design and construction of a simple, straight-run stair.
![modern staircase by thirdstone inc. [^]](http://www.decor-ideas.org/upload/cases/2013-07-16/photos/middle/1843520130716085708933042555500.jpg)
A straight-run stair is just that: a stair that doesn't turn or curve or something else. It just simply travels in a straight line from a lower floor to an upper floor and vice versa.
Though we'll be looking in detail at a closed-riser stair, this stair has open risers. Some building departments don't allow such a stair design, as there's a fear that small children may slip between the treads and fall.
What's interesting in this stair is that the open risers are kept narrow, 4 inches or less, to comply with the local building code and still be open.
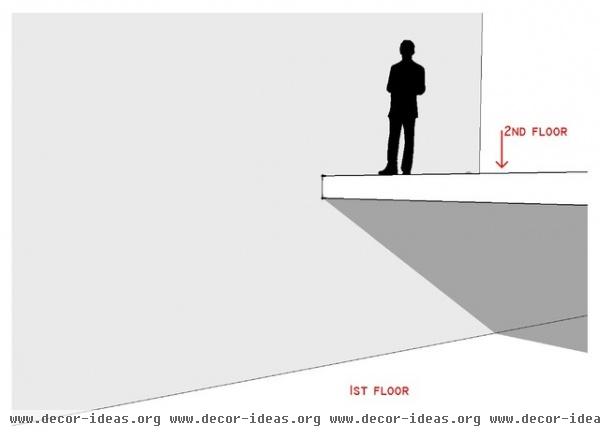
As mentioned at the outset, a stair is an architectural element that allows people to easily move between differing floor levels in a building. Let's help Bob here find his way from the second floor to the first floor without having to slide down a fire pole, jump or take an elevator.
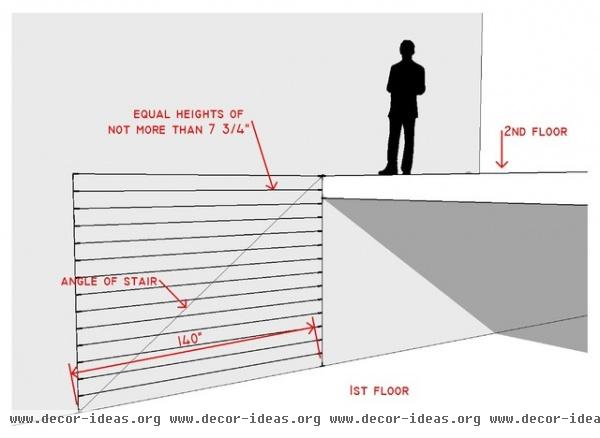
Get the angle right. The first thing we'll do is set up the geometry for our new stair. We'll divide the total rise (the distance from the first floor to the second floor) into equal parts, with each part not more than 7¾ inches (the maximum height allowable per the International Residential Code, or IRC).
Next we'll want to establish the overall length of the stair, also called the carriage or total run. In our example that will be 140 inches. Now we know that we need a space that's at least 36 inches wide (a minimum code requirement) by 140 inches long (plus landings at the top and bottom) for the stair. We also know that the angle of the stair won't be too shallow or too steep, so it will be comfortable to walk up and down.
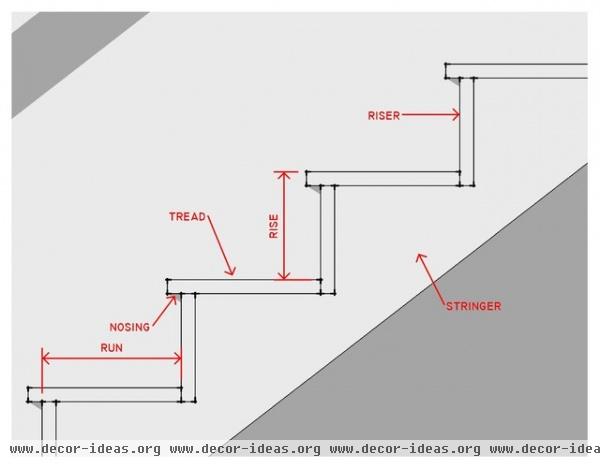
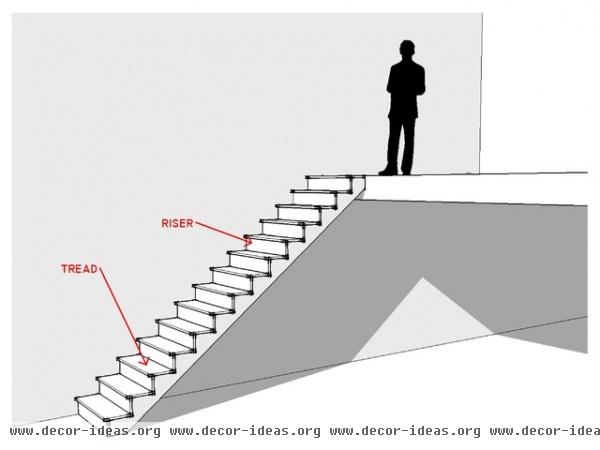
Fitting our feet. Looking in detail at how our stair lays out, the geometry of the treads (horizontal walking surfaces) and risers (vertical pieces at the back of each tread) is set. And note that while each tread is 10 inches deep, there's a 1-inch nosing that provides an overall depth of 11 inches. This is a comfortable dimension for most people, as it provides a suitable landing spot for most feet.
Supporting our weight. Now that we've gotten our geometry set and know we comply with the building codes, we can start to build our stair.
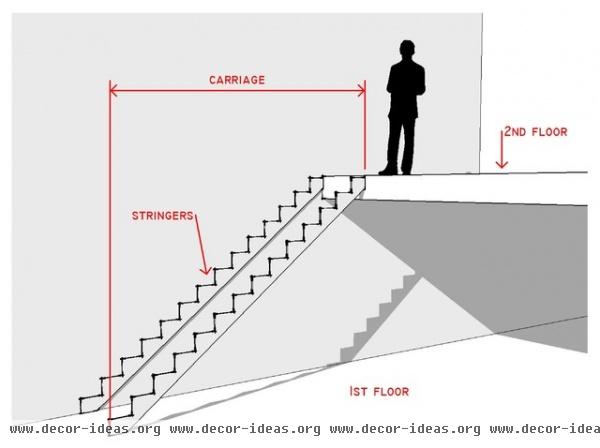
First come the stringers. These are the sawtooth sides of the stair that the treads and risers will attach to. While a stringer can be of just about any material (wood, steel, aluminum, glass, plastic etc.), more often than not in residential contruction, it is made of wood. By simply taking a solid piece of wood and then cutting out the teeth, we'll have the basic structure of our stair.
Stringers are typically designed to be strong enough to support themselves and the weight of risers, treads and people. This allows a stair to "float" away from a wall if that's the desired design. Of course, if the stringers aren't designed to support all of the added weight of people etc., make sure that they get attached to an adjacent structural element.
Next come the treads and risers. Once these are in place, you'll have a finished stair that can be used to go from one level to the next.
An important design consideration is whether or not the treads and risers are to be visible surfaces or if these pieces will be covered with a finish (tile, stone, carpet etc.). For example, you can save some money by using utility-grade lumber for the treads and risers.
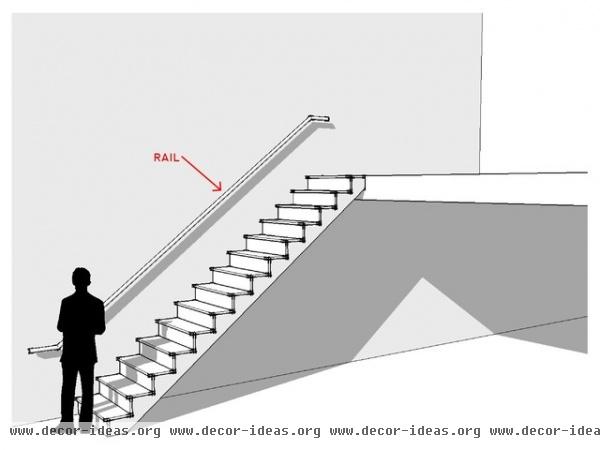
Preventing falls. While the stair is complete, our friend Bob can't make his way down it safely until there are railings. On the open side of the stair as well as at the second-floor landing, there should be a guardrail (not shown) that will prevent Bob from falling to the floor below.
Another rail that will be needed is a handrail adjacent to the wall. The design, size and position of this rail is governed by building codes.

Specifically, the rail can't be more than 38 inches or less than 34 inches above a tread (or walking surface), and must be extended horizontally at the top and bottom.
Another code consideration is the requirement to provide at least 80 inches of headroom above any walking surface. Just keep in mind that this, the height of a standard residential door, is the minimum; as such, I've always found it to be very constricting.
Photos: See these components in thousands of stairway designs