Transition Time: How to Connect Tile and Hardwood Floors
Transitioning a bathroom's tile floor to the hardwood of another room is often given little forethought. However, not planning the transition can result in a final product that doesn't meet your expectations, or a floor assembly that's destined to fail.
Most of the floor framing in North America is designed to meet a base industry standard. This standard (usually measured as a deflection rating) allows for materials like small ceramic tile, vinyl, carpet and hardwood to be used on floors. But these days most of my clients want large, natural stone tile.
Many also want the tile to transition seamlessly from one room to the other. This can be done, but most homeowners don't know that their home has to be designed with extra strength and rigidity to carry this weight.
Below you'll learn what to specify when planning a transition from tile flooring to hardwood.

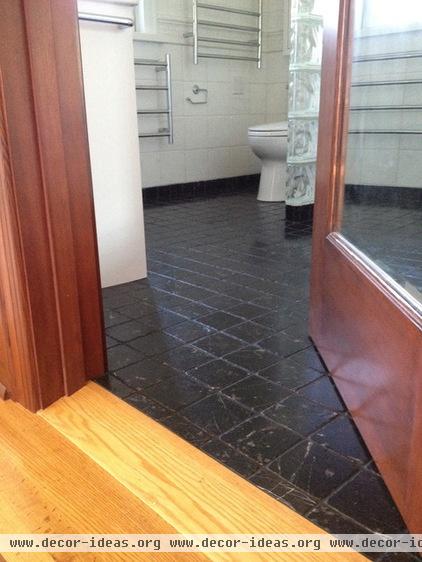
This bathroom is a great example of current trends in bathroom design: plenty of space, bright light, a great soaking tub and a walk-in barrier-free shower.
Notice the flush transition from hardwood flooring to tile. Looking closer (click on the photo to enlarge it), you'll see that the tile is large (about 1 foot by 2 feet) and made of marble; both features require a stiffer floor than most homes have.
Tip: If you're working with large-format tile or natural stone, specify that your rooms meet a stronger deflection rating: L/720, instead of the base-standard L/360. This number indicates how much flex a floor has before tile is installed — both the Tile Council of North America (TCNA) and the Terrazzo, Tile and Marble Association of Canada (TTMAC) require L/720 for heavy installations.

Most of today's floor tile is ⅜ inch to ¾ inch thick. Most hardwood flooring is ¾ inch thick. This means that when you put tile next to hardwood flooring, your tile choice will be critical for a flush transition.
Simply tiling on top of a plywood subfloor is not an option — this practice is frowned upon and is not permitted by the TCNA or TTMAC. However, you can install a thin uncoupling mat (like Laticrete's Strata Mat or Schluter Systems' Ditra) to meet the tile industry's requirements.
Tip: Installing a second layer of plywood over your subfloor and under your hardwood allows for more floor preparation options in the future. This is also a valid option if your home's floor joists were not designed for a stronger, heavier floor. However, this should be planned early on, since it affects how your stairs and stair risers are built.

Here's an action shot of tile being installed over an uncoupling membrane from Laticrete, which prepares the plywood subfloor for tile.
Tip: If your floor isn't strong enough to meet the right deflection rating, an uncoupling membrane won't help. Increasing the floor joist width or adding another layer of plywood is a better and safer option.
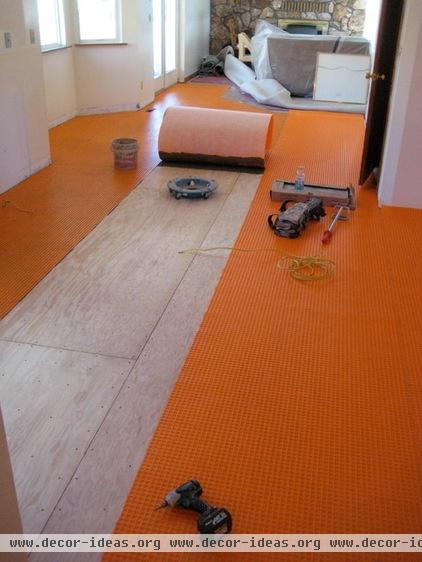
Here Tarkus Tile is prepping for a tile installation with a second layer of plywood and an uncoupling membrane. The orange material (Schluter Systems' Ditra) was installed with a quality modified thinset (mortar). Since this home's existing framing was not suited to hold the new tile selection, the installers beefed up the subfloor to make sure the installation would last for years to come.
Tip: The choice between a flush installation from tile to hardwood and one that meets industry guidelines should not be a hard one. Always follow industry guidelines! They will probably be stricter than local building codes.
This custom oak transition helps adjust for the difference between the bathroom floor and the bedroom floor in this master suite. This is often called a reducing wood transition, because it works with two surfaces, reducing their height differences.
We centered the tile installation under the door, so when the door is closed you see only tile in the bathroom and oak in the bedroom.
Tip: I find that these transitions look cleaner if the door jamb (the vertical part of the door frame) overlaps the tile a little bit. But this is hard to do if the tile hasn't been installed yet. If possible, install your bathroom door after the tile installation.

The simplest way to link floor tile and hardwood of different heights is with a transition strip. These strips can be finished to look like the floor or painted to stand out.
Tip: Leave ⅝ inch to ¾ inch of space centered underneath the door for the bottom of the transition strip. If you affix a piece of scrap baseboard or plywood in the same size, it'll help keep this channel clean of thinset, making the transition strip much easier to install.

A custom transition can be milled by your flooring contractor for installation after the tile is complete. Notice where the wood transition meets the tile here — the wood is not cut to a feathered edge but kept to about ⅛ inch thick. This makes the edge stronger. The reducing transition also overlaps the tile, which helps with movement, since wood and tile expand at different rates.
More: 20 Great Examples of Transitions in Flooring